- Disconnect the negative battery cable and relieve the fuel system pressure.
- Siphon or pump as much fuel as possible out through the fuel filler pipe.
NOTE: Fuel injected vehicles have reservoirs inside the
fuel tank to maintain fuel near the fuel pick-up during cornering or low-fuel
operation. These reservoirs could block siphon hoses or tubes from reaching
the bottom of the fuel tank. Repeated attempts, using different hose orientations,
can overcome this obstacle.
- Raise and safely support the vehicle.
- If equipped, remove the skid plate attaching bolts, then lower the plate
and remove it.
NOTE: On Navajo models, the front fuel tank strap is bolted
to the skid plate and will be disconnected when the plate is removed.
- Disconnect the fuel fill and vent hoses connecting the filler pipe to the
tank.
- On vehicles equipped with a metal retainer fastening the filler pipe to
the fuel tank, remove the screw holding the retainer to the fuel tank flange.
- Disengage the fuel lines and the electrical connections to the fuel tank
sending unit/fuel pump assembly. On some vehicles, these are inaccessible
on top of the tank. In this case, they must be disconnected when the tank
is partially lowered. To disconnect the lines from the sending unit/fuel pump
assembly, refer to "FUEL LINES and FITTINGS" earlier in this section.
- Place a safety support (such as a floor jack) under the fuel tank and remove
the bolts from the fuel tank straps. Allow the straps to swing out of the
way. Be careful not to deform the fuel tank.
NOTE: On B Series Pick-up vehicles, the rear fuel tank
strap has two connections which must be unbolted.
- Lower the tank a few inches, then detach the fuel lines and electrical connection
from the sending unit/fuel pump assembly, if required.
- Remove the tank from the vehicle.
| Fig. 1: Exploded view of the Navajo fuel filler assembly
|
| Fig. 2: Exploded view of the Navajo fuel tank assembly
|
| Fig. 3: Exploded view of the B Series Pick-up fuel
filler assembly and pump mounting
|
| Fig. 4: Exploded view of the 1996–97 B Series
Cab Plus fuel tank assembly — other years similar
|
| Fig. 5: Exploded view of the 1994 B Series Pick-up
Regular Cab fuel tank assembly — other years similar

|
To install:
- Before installation, it would be wise to perform the following:
- Double-check the tightness of the sending unit/fuel pump locking ring.
If it is already loose, now would be a good time to remove it and check
the condition of the gasket underneath.
- Ensure that all metal shields are reinstalled in their original positions
and that the fasteners are secure.
- Be sure that the fuel vapor valve is completely installed on top of
the fuel tank.
- Make all necessary fuel line or wiring connections which will be inaccessible
after the fuel tank is installed.
- Raise the fuel tank into position in the vehicle. If necessary, attach the
fuel lines and sending unit electrical connector before the tank is in its
final position.
- Lubricate the fuel filler pipe with a water-based lubricant. Install the
tank onto the filler pipe, then bring the tank into final position. Be careful
not to deform the tank.
- Position the tank straps around the tank and start the retaining nut or
bolt. Align the tank with the straps. If equipped, be sure the fuel tank shields
are installed with the straps and are positioned correctly.
- Check the hoses and wiring on top of the tank. Make sure they are correctly
routed and will not be pinched between the tank and body.
- Tighten the fuel tank strap retaining nuts or bolts to 25–34 ft. lbs.
(34–46 Nm).
- If not already attached, connect the fuel hoses and lines. Make sure the
fuel supply, fuel return (if present) and the vapor vent attachments are made
properly. If not already attached, connect the sending unit.
- If removed, install the fuel tank skid plate.
- Lower the vehicle.
- Connect the negative battery cable.
- Fill the tank with fuel and check all connections for leaks.
CAUTION
Observe all applicable safety precautions when working around fuel. Whenever
servicing the fuel system, always work in a well ventilated area. Do not allow
fuel spray or vapors to come in contact with a spark or open flame. Keep a dry
chemical fire extinguisher near the work area. Always keep fuel in a container
specifically designed for fuel storage; also, always properly seal fuel containers
to avoid the possibility of fire or explosion.
- Relieve the fuel system pressure and disconnect the negative battery cable.
- Remove the fuel filler cap. Raise and safely support the vehicle.
- If equipped, remove the fuel pipe protector and tank under guard.
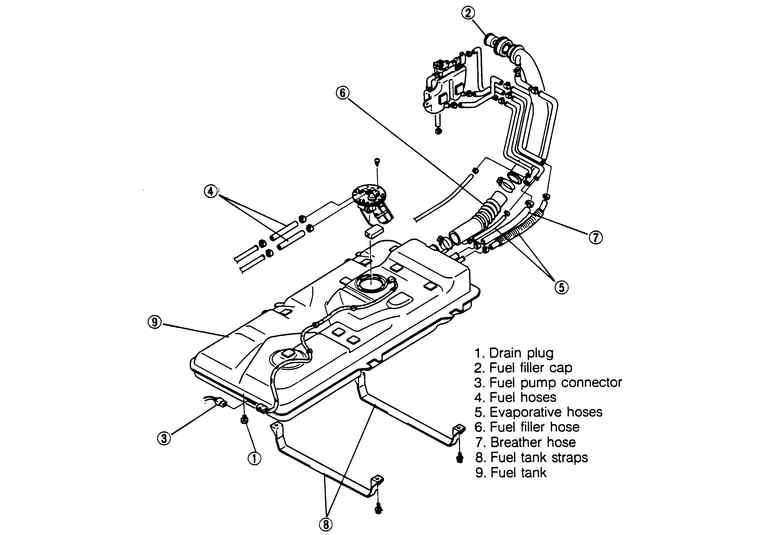
- Position a suitable container under the fuel tank. Remove the drain plug
and drain the tank.
- Disconnect the fuel pump electrical connector.
- Disconnect the fuel lines, evaporative hoses, breather hose and fuel filler
hose.
- If equipped, remove the nonreturn valve from the fuel filler pipe and inspect
its condition. Replace, if necessary.
- Support the tank with a jack. Remove the retaining bolts and the fuel tank
straps.
- Lower the fuel tank from the vehicle.
| Fig. 6: Fuel tank assembly — 1994–95
MPV
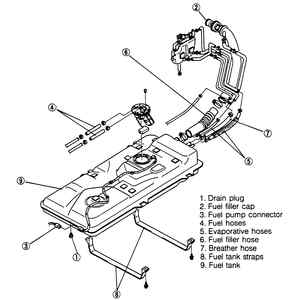
|
| Fig. 7: Fuel tank assembly — 1996–98
MPV
|
To install:
- Raise the fuel tank into position and install the straps and retaining bolts.
Tighten to 32–44 ft. lbs. (44–60 Nm). Remove the jack.
- If equipped, install the nonreturn valve into the fuel filler pipe until
the stopper portion of the valve completely fits the pipe.
- Connect the fuel and evaporative hoses, making sure they are pushed onto
the fuel tank fittings at least 1 in. (25mm). Connect the breather hose.
- Connect the fuel filler hose, making sure the hose is pushed onto the fuel
tank pipe and filler pipe at least 1.4 in. (35mm).
- Connect the fuel pump electrical connector.
- If equipped, install the fuel tank under guard and the fuel pipe protector.
Tighten the fuel pipe protector retaining bolts to 14–19 ft. lbs. (19–26
Nm).
- Install the drain plug and lower the vehicle.
- Fill the fuel tank and install the filler cap. Check for leaks.
- Connect the negative battery cable.
- Start the engine and check for leaks.