Previous Next

Windshield Wiper Motor

REMOVAL & INSTALLATION

Front Wiper Motor
NAVAJO AND B SERIES PICK-UP MODELS

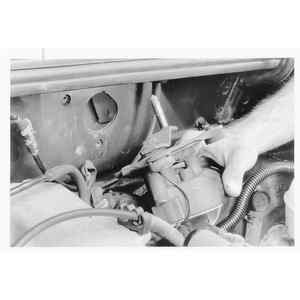
Fig. 1: Typical view of the front wiper motor and linkage assemblies

  1. Turn the wiper switch on. Turn the ignition switch on until the blades are straight up and then turn ignition off to keep them there.
  2. Remove the right wiper arm and blade. Remove the linkage access cover retaining screws . . .

    . . . and remove the cover

  3. Remove the negative battery cable.
  4. Remove the right pivot nut and allow the linkage to drop into the cowl.
  5. Remove the linkage access cover, located on the right side of the dash panel near the wiper motor. Reach into the access hole and disconnect the wiper motor linkage clip from the motor shaft

    Remove the clip. Also, remove the linkages from the wiper motor shaft

  6. Reach through the access cover opening and unsnap the wiper motor clip.
  7. Push the clip away from the linkage until it clears the nib on the crank pin. Then, push the clip off the linkage. Disconnect the wiper motor's wiring harness plug . . .

    . . . and remove the harness from any holding clips

    Remove the ground wire retaining nut . . .

    . . . and the ground wire from the wiper motor attaching stud

  8. Remove the wiper linkage from motor crank pin.
  9. Disconnect the wiper motor's wiring connector.
  10. remove the wiper motor's three attaching screws and remove the motor. Remove the three wiper motor-to-firewall attaching screws . . .

    . . . then withdraw the wiper motor and crank assembly from the firewall

    To install:

  11. Install the motor and attach the three attaching screws. Tighten to 60–65 inch lbs. (6.7–7.3 Nm).
  12. Connect the wiper motor's wiring connector.
  13. Install the clip completely on the right linkage. Make sure the clip is completely on.
  14. Install the left linkage on the wiper motor crank pin.
  15. Install the right linkage on the wiper motor crank pin and pull the linkage on to the crank pin until it snaps.

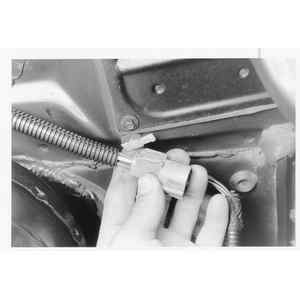
    NOTE: The clip is properly installed if the nib is protruding through the center of the clip.

  16. Reinstall the right wiper pivot shaft and nut.
  17. Reconnect the battery and turn the ignition ON. Turn the wiper switch off so the wiper motor will park, then turn the ignition OFF. Replace the right linkage access cover.
  18. Install the right wiper blade and arm.
  19. Check the system for proper operation.
1994–95 MPV MODELS
  1. Disconnect the negative battery cable.
  2. Unplug the electrical connector from the wiper motor.
  3. Disconnect the wiper linkage from the motor crank arm. If necessary to remove the crank arm from the motor, matchmark the arm to the bracket prior to removal.
  4. Remove the mounting bolts and remove the wiper motor.

    To install:

  5. Position the wiper motor and install the mounting bolts. Tighten to 61–87 inch lbs. (6.9–9.8 Nm).
  6. If removed, install the motor crank arm, aligning the marks that were made during removal.
  7. Connect the wiper linkage to the motor crank arm. Plug in the electrical connector.
  8. Make sure when in the park position, the wiper blades are 0.98–1.38 in. (25–35mm) from the lower windshield moulding.
1996–98 MPV MODELS
  1. Make sure the wipers are in the parked position.
  2. Disconnect the negative battery cable and wait at least 90 seconds before performing any work.
  3. Remove the 2 nuts and remove the 2 wiper arms.
  4. Remove the 2 nuts and the 2 seal rings securing the wiper transmission to the cowl.
  5. Remove the 2 bolts securing the wiper motor bracket and disconnect the wiper motor connector.
  6. Disconnect the wiper transmission from the wiper motor bell crank by carefully prying the transmission link from the bell crank.

    Fig. 2: Exploded view of the windshield wiper linkage assembly

  7. Remove the nut and the O-ring and remove the bell crank from the wiper motor.
  8. Remove the 3 wiper motor mounting bolts and the wiper motor.

    To install:

  9. Install the wiper motor with the 3 mounting bolts and torque the bolts to 61–86 inch lbs. (6.9–9.8 Nm).
  10. Install the bell crank to the wiper motor with the seal and the nut.
  11. Install the wiper transmission to the bell crank.
  12. Install the wiper transmission assembly through the openings in the cowl panel. Reconnect the wiper motor connector and install the 2 bolts securing the wiper motor bracket.
  13. Install the wiper pivot seal rings and secure with the 2 nuts. Torque the nuts to 61–86 inch lbs. (6.9–9.8 Nm).
  14. Reinstall the wiper arms and secure with the 2 nuts. Torque the nuts to 86.8–120 inch lbs. (9.81–13.7 Nm).
  15. Reconnect the negative battery cable and check for proper operation.
Rear Window Wiper Motor
MPV MODELS

Fig. 3: Ater removing the wiper arm, pull the bushing off of the motor shaft

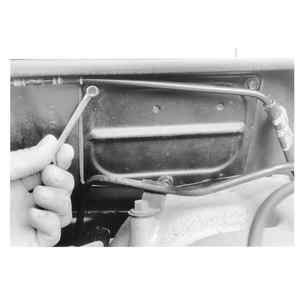
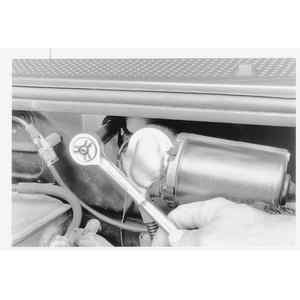
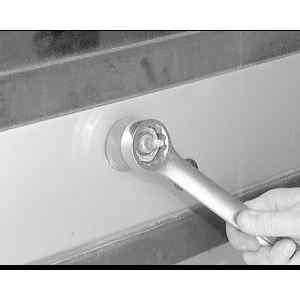
Fig. 4: Using an adjustable wrench, or a 29mm ox wrench, loosen the motor shaft-to-tailgate retaining nut

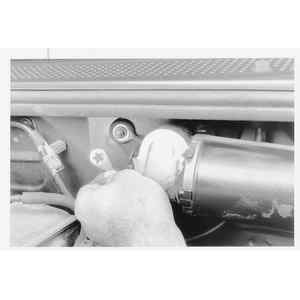
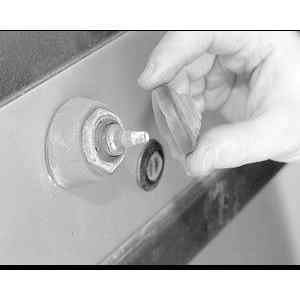
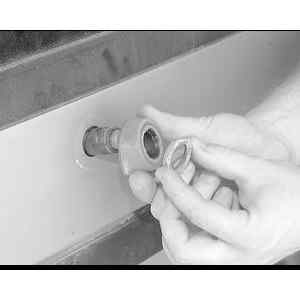
Fig. 5: Remove the motor shaft retaining nut and shaft grommet

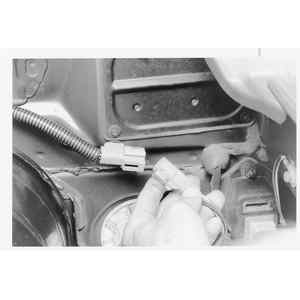
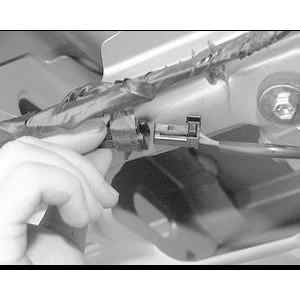
Fig. 6: Disengage the black rear wiper motor electrical connector

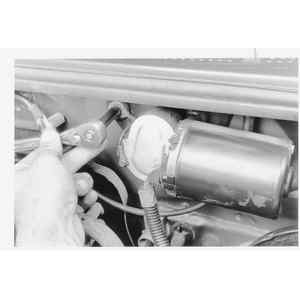
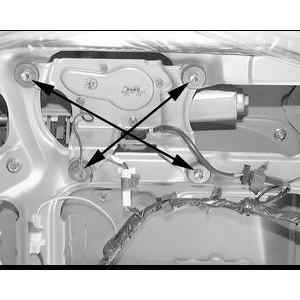
Fig. 7: Location of the rear wiper motor assembly mounting bolts. Remove these bolts using a 10mm socket

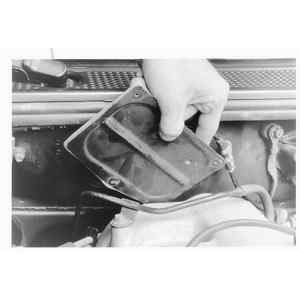
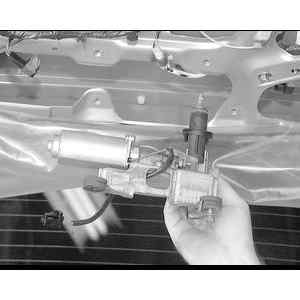
Fig. 8: Remove the rear wiper motor assembly from the tailgate door

  1. Disconnect the battery ground cable.
  2. Remove the protective cap and wiper arm nut and pull off the wiper arm, seal and bushing.
  3. Remove the liftgate inner trim panels.
  4. Remove the weathershield.
  5. Disconnect the wiper motor wiring.
  6. Remove the motor mounting bolts and lift out the motor.
  7. Installation is the reverse of removal.
NAVAJO MODELS

Fig. 9: Rear wiper motor assembly and related components

  1. Disconnect the negative battery cable.
  2. Remove the wiper arm and blade.
  3. Remove the liftgate interior trim.
  4. Remove the motor attaching bolts (3). Disconnect the electrical leads.
  5. Remove the wiper motor from the vehicle.

    To install:

  6. Install the wiper motor in position and connect the electrical leads.
  7. Install the liftgate trim. Connect the negative battery cable.

Previous Next