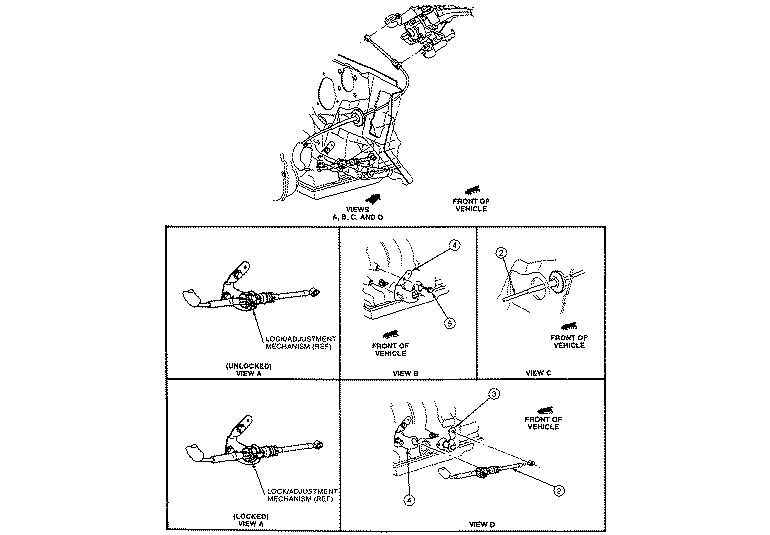
| Fig. 1: Exploded views of the shift cable assembly and
mounting
|
NOTE: Before performing the linkage adjustment, confirm that
the shift indicator is properly adjusted.
- Turn the vehicle OFF, block the rear wheels and engage the parking
brake.
- From inside the vehicle, place the gear shift lever in the overdrive position
(shown as a circle with the letter D in the middle). Hang a 3 lb. (1.4Kg)
weight on the lever.
- Raise and safely support the vehicle.
- From underneath, use a prytool to remove the shift control cable end from
the transmission manual control lever ball stud.
- Unlock the cable adjuster body by pushing down on the two tangs and releasing
the lock tab.
- Move the shift cable back and forth the full adjustment length four or five
times to remove any accumulated dirt. Ensure that the adjuster body moves
freely.
- Move the transmission manual control lever all the way rearward (counterclockwise)
to its last position, then move it forward three detent positions. The transmission
is now set in the overdrive position.
- Holding the cable end fitting, push it rearward until the fitting lines
up with the lever ball stud. Connect the cable end to the ball stud.
- Push up on the lock tab to lock the adjuster body into position. Ensure
that the locator tab is properly seated.
- Ensure that the shift cable is properly clipped to the floorpan and that
is routed into the tunnel.
- Lower the vehicle.
- Remove the weight from the gear select lever.
- After adjustment, check for Park (P) engagement. Start the engine and check
all the lever positions for proper operation.
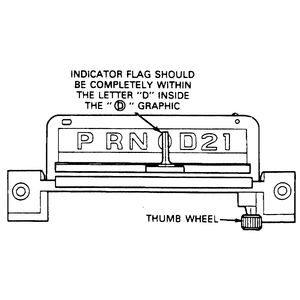
To test the shift select indicator:
- Turn the engine OFF, apply the parking brake and place the transmission
select lever in the OD (overdrive) position.
- Hang a 3 lb. (1.4Kg) weight on the select lever.
- Look at the selector indicator on the instrument panel. The pointer should
be centered on the D within the overdrive (circle with a letter D in the middle)
graphic. If it is not, adjust as follows.
| Fig. 2: Remove the steering column shroud fasteners,
then remove the shrouds

|
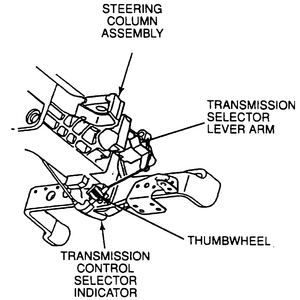
To adjust the indicator:
- Remove the steering wheel.
- Remove the lower steering column trim panel from the dash board.
- Remove the lower steering column shroud by removing the two securing screws.
- Lift off the upper steering column shroud.
- On 1996–98 vehicles, remove the ignition switch lock cylinder.
- With the engine OFF and the parking brake set, move the
transmission select lever into the overdrive position. Hang a 3 lb. (1.4Kg)
weight on the lever.
| Fig. 3: There are two styles of thumb wheel adjusters.
One style is mounted to the indicator assembly . . .
|
| Fig. 4: . . . the other style is mounted to the underside
of the column
|
- Turn the adjuster thumb wheel to properly position the pointer until it
is centered on the overdrive graphic.
- If removed, install the ignition switch lock cylinder.
- Install the upper and lower steering column shrouds and the steering wheel.
- Remove the weight from the lever.
- Operate the shift select lever in all positions and ensure that the indicator
pointer aligns with all of the position graphics.
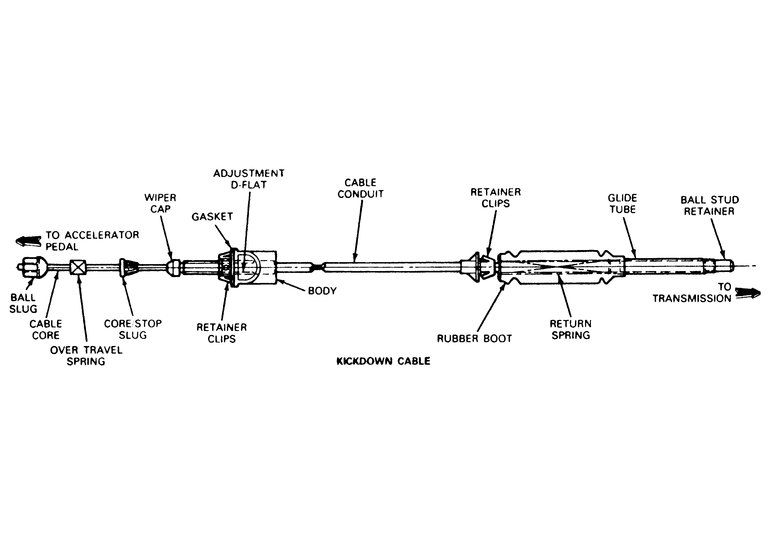
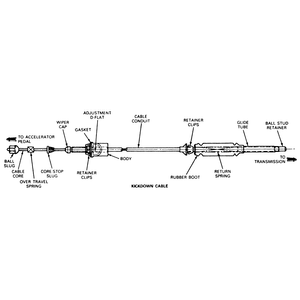
The kickdown cable is self-adjusting over a tolerance range of 1 in. (25mm).
If the cable requires readjustment, reset the by depressing the semi-circular
metal tab on the self-adjuster mechanism and pulling the cable forward (toward
the front of the vehicle) to the "Zero'' position setting. The cable will then
automatically readjust to the proper length when kicked down.
| Fig. 5: View of the transmission kickdown cable assemble
and its adjusting points
|
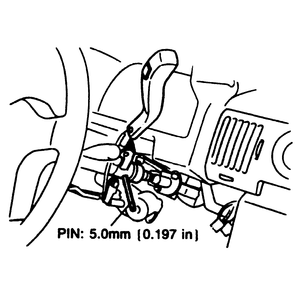
- Move the selector lever to the P range.
- Remove the column covers.
- Pull the selector lever rearward, toward the driver and insert a 0.197 in.
(5mm) outer diameter pin into the gearshift rod assembly.
- Remove the air intake tube.
| Fig. 6: Pull the selector lever rearward, toward
the driver and insert a 0.197 in. (5mm) outer diameter pin into the
gearshift rod assembly
|
| Fig. 7: Make sure the detent ball is positioned in
the center of the Prange detent
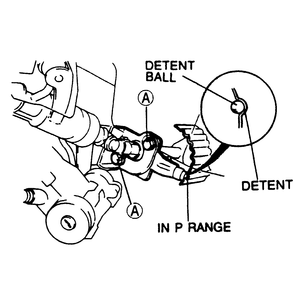
|
- Loosen the shift lever and the top lever mounting bolts.
- Shift the transmission manual shaft to the P range position.
- Adjust the clearance between the lower bracket and the shift lever bushing
by sliding the shift lever assembly until there is no clearance.
- Tighten the shift lever mounting bolts to 12–17 ft. lbs. (16–23
Nm).
- Make sure the detent ball is positioned in the center of the P range
detent. If not, loosen the linkage bolts and turn the bracket to adjust the
position, then retighten the bolts to 61–87 inch lbs. (7–10 Nm).
- Adjust the clearance between the lower bracket and the shift lever bushing
by turning the top lever until there is no clearance. Tighten the top lever
mounting bolt, then retighten the remaining bolt to 12–17 ft. lbs. (16–23
Nm).
- Remove the pin from the gear shift rod assembly and install the column covers.
Check selector lever operation.
- Connect an ohmmeter across terminals C and D of the kick-down switch. Make
sure that there is continuity when the tip of the switch is depressed 0.236–0.256
inch (6.0–6.5mm). If not, proceed:
- Disconnect the wiring.
| Fig. 8: Measure the continuity between terminals
C and D with the switch depressed
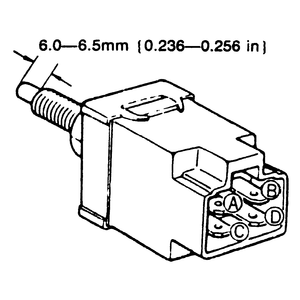
|
| Fig. 9: With the pedal held down, turn the kick-down
switch clockwise until a click is heard, then, turn it 1⁄4 turn
further

|
- Loosen the switch locknut and back the switch out fully.
- Depress the accelerator pedal fully and hold it.
- With the pedal held down, turn the kick-down switch clockwise until a click
is heard, then, turn it 1⁄4 turn
further.
- Tighten the locknut.
- Release the pedal and reconnect the wiring.
- Depress the accelerator pedalfully and verify that a click is heard. If
not, replace the solenoid.