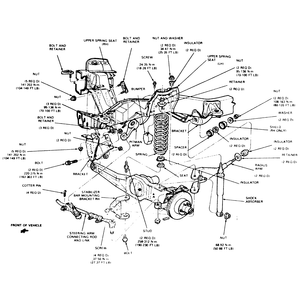
| Fig. 1: Exploded view of the front drive axle on Navajo
and 1994–97 B Series Pick-ups

|
- Disconnect the negative battery cable.
- Raise and support the vehicle safely. Remove the wheel and tire assembly.
NOTE: Before removing the driveshaft from the front axle
yoke, mark the yoke and driveshaft so that they can be reassembled in the
same relative position, thus eliminating driveshaft imbalance.
- Disconnect the driveshaft from the front axle yoke.
- Remove the disc brake calipers and support the caliper on the vehicle's
frame rail.
- Remove the cotter pin and nut retaining the steering linkage to the spindle.
Disconnect the linkage from the spindle.
NOTE: The axle arm assembly must be supported on the jack
throughout spring removal and installation and must not be permitted to
hang by the brake hose. If the length of the brake hose is not sufficient
to provide adequate clearance for the removal and installation of the spring,
the caliper must be removed.
- Remove the bolt and nut and disconnect the shock absorber from the radius
arm bracket.
- Remove the stud and bolts that connect the radius arm bracket and radius
arm to the axle arm. Remove the bracket and radius arm.
- Remove the pivot bolt securing the right handle axle arm assembly to the
crossmember. Remove the keystone clamps securing the axle shaft boot from
the axle shaft slip yoke and axle shaft and slide the rubber boot over. Disconnect
the right driveshaft from the slip yoke assembly. Lower the jack and remove
the right axle arm assembly.
- Position another jack under the differential housing. Remove the bolt that
connects the left axle arm to the crossmember. Lower the jacks and remove
the left axle arm assembly.
To install:
- Position the under the left axle arm assembly. Raise the axle arm until
the arm is in position in the left pivot bracket. Install the nut and bolt
and tighten to 120–150 ft. lbs. (163–203 Nm).
NOTE: Do not remove the jack from under the differential
housing at this time.
- Place new keystone clamps for the axle shaft boot on the axle shaft assembly.
Position the right axle arm on a jack and raise the right axle arm so the
right driveshaft slides onto the slip yoke stub shaft and the axle arm is
in position in the right pivot bracket. Install the nut and bolt and tighten
to 120–150 ft. lbs. (163–203 Nm).
NOTE: Do not remove the jack from the right axle arm at
this time.
- Position the radius arm and front bracket on the axle arms. Install a new
stud and nut on the top of the axle and radius arm assembly and tighten to
160–220 ft. lbs. (217–298 Nm). Install the bolts in the front
of the bracket and tighten to 27–37 ft. lbs. (37–50 Nm).
- Install the seat, spacer retainer and coil spring on the stud and nut. Raise
the jack to compress the coil spring. Install the nut and tighten to 70–100
ft. lbs. (95–135 Nm).
- Connect the shock absorber to the axle arm assembly. Install the nut and
tighten to 42–72 ft. lbs. (57–97 Nm).
- Connect the tie rod ball joint to the spindle. Install the nut and tighten
to 50–75 ft. lbs. (68–101 Nm).
- Lower the jacks from the axle arms.
- Install the disc brake calipers. Install the wheel and tire assembly. Install
the lug nuts and tighten to 85–115 ft. lbs. (115–155 Nm).
- Connect the front output shaft to the front axle yoke. Install the U-bolts
and tighten to 8–15 ft. lbs. (11–20 Nm).
- Remove the jacks and lower the vehicle.
- Reconnect the negative battery cable.
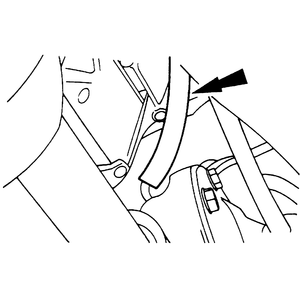
| Fig. 2: Disconnect the axle vent tube at the axle

|
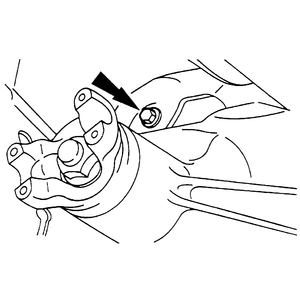
| Fig. 3: With the axle supported, remove the left front
axle-to-frame bolt first

|
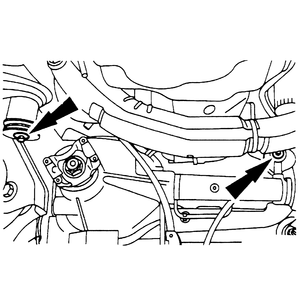
| Fig. 4: Remove the two remaining axle-to-frame attaching
bolts then lower the axle housing

|
NOTE: The manufacturer recommends using new fasteners when
installing the front axle. Before beginning this procedure, make sure to acquire
new mounting bolts.
- Remove the front axle halfshafts. Refer to axle shaft and seal procedures
earlier in this Section.
- Matchmark the front driveshaft to the front axle companion flange.
- Unbolt the front driveshaft retaining straps from the front axle assembly
and support it out of the way.
WARNING
Do not allow the driveshaft to hang unsupported, damage to the shaft and
or U-joint can occur.
- Disconnect the axle vent tube.
- Place a jack under the front axle to support it.
- Remove the left front axle-to-frame attaching bolt.
- Remove the remaining two axle-to-frame bolts.
- Lower the axle assembly and remove it from under the vehicle.
To install:
- Place the axle assembly on a jack and position it under the vehicle.
- Raise the axle assembly up and align the three mounting holes.
- Install the three mounting bolts and tighten them to 45–59 ft. lbs.
(60–80 Nm).
- Connect the axle vent tube.
- Install the front driveshaft to the axle companion flange, aligning the
matchmarks made earlier, then install the retaining straps and tighten the
bolts.
- Install the axle halfshafts.
NOTE: The differential is removed as a unit with the freewheel
mechanism. After removal, the differential can then be separated from the freewheel
mechanism, if necessary.
- Raise and safely support the vehicle. Remove the wheel and tire assemblies.
- Remove the splash shield and drain the differential fluid.
- Remove the halfshafts.
- Mark the position of the driveshaft on the axle flange and remove the driveshaft.
- Tag and disconnect the vacuum hoses and electrical connector from the freewheel
mechanism control box.
- Support the differential with a jack.
- Remove the bolts/nuts attaching the differential/freewheel mechanism assembly
in 3 places and lower the assembly from the vehicle.
- If necessary, separate the freewheel mechanism from the differential.
| Fig. 5: Exploded view of the front drive components — MPV
with 4WD

|
To install:
- If removed, install the freewheel mechanism.
- Raise the differential/freewheel mechanism assembly into position and install
the attaching bolts/nuts. Tighten to 49–72 ft. lbs. (67–97 Nm).
Remove the jack.
- Install the remaining components in the reverse order of their removal.
Fill the differential with the proper type and quantity of fluid.


