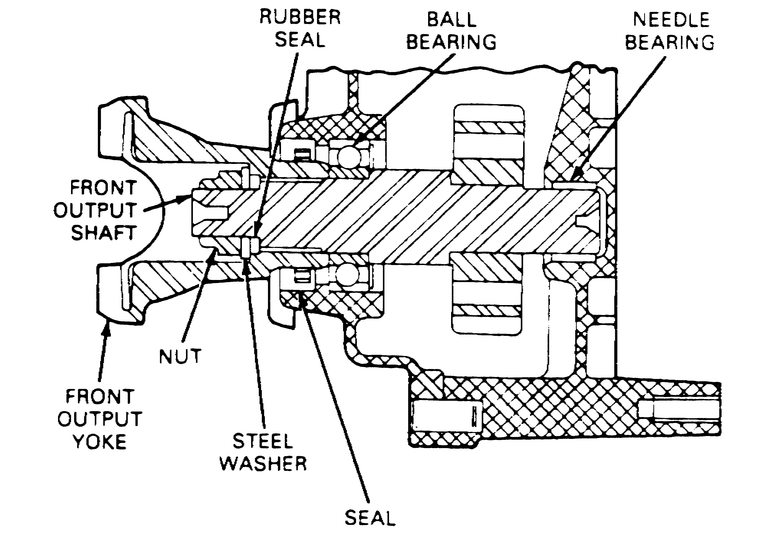
Fig. 1: Cutaway view of the front output shaft , seal
and yoke assembly — rear components are similar
Place the transfer case in 4WD mode. If automatic transmission, place it
in the P position. If manual transmission, place it in gear.
Raise and safely support the vehicle.
If equipped, remove the skid plate from the frame.
If equipped, remove the damper from the transfer case.
Place a drain pan under the transfer case, remove the drain plug and drain
the fluid.
Matchmark the front driveshaft to the transfer case yoke then disconnect
the shaft from the yoke. Wire the driveshaft up and out of the way.
Using a 30mm (1.18 in.) thin-wall socket, remove the rear output shaft yoke
retaining nut.
Remove the output shaft yoke washer, rubber seal and the yoke from the output
shaft.
Remove the front output shaft seal by prying and pulling on the curved outer
lip of the seal. Take care to not damage the bearing, bearing cage or case.
To install:
Ensure that the output housing bore is free of any dirt, burrs or nicks.
Apply molybdenum grease to the seal lip.
Position the new seal to the output housing and using an appropriate driver,
such as the Output Shaft Seal Installer 49-U027-003 and Driver Handle 49-F027-003
(B Series Pick-up/Navajo) or 49-G030-797 (MPV), press the seal into the housing
until fully seated.
Install the front output shaft yoke, rubber seal and washer.
Install the output shaft yoke retaining nut and tighten to 184–203
ft. lbs. (250–275 Nm).
Connect the front driveshaft to the transfer case.
If removed, install the damper using new bolts. Be sure to apply threadlock
to the bolts. Tighten the bolts to 25–35 ft. lbs. (34–48 Nm).
Remove the oil fill plug and add the proper amount of Dexron/Mercon® automatic
transmission fluid.
If removed, install the skid plate. Tighten the skid plate mounting nuts
and bolts to 15–20 ft. lbs. (20–27 Nm).