Previous Next

REMOVAL & INSTALLATION

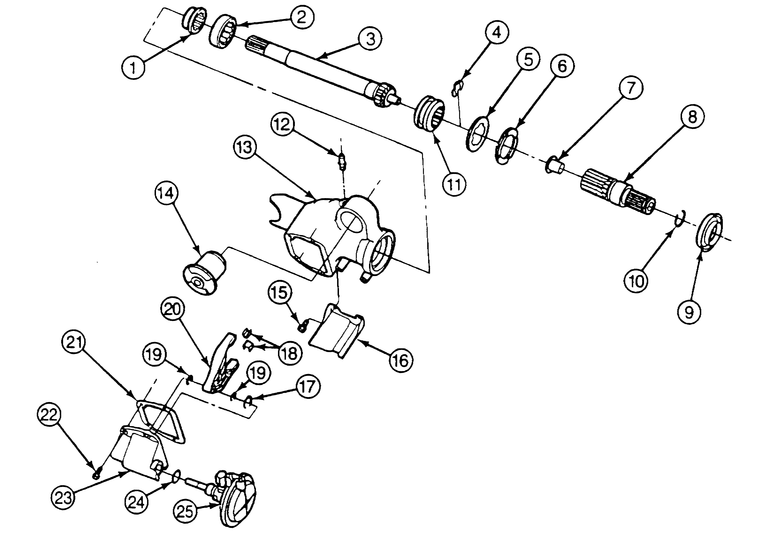
Fig. 1: Exploded view of the vacuum disconnect axle lock assembly on 1998 B Series Pick-up

  1. Raise and safely support the front of the vehicle.

    NOTE: If possible, support the right side of the vehicle slighly higher than the left. This will minimize the amount of axle fluid lost when the center disconnect shift motor cover is removed.

  2. Position a drain pan beneath the center disconnect shift motor cover.
  3. Label and disconnect the vacuum lines at the shift motor.
  4. Unplug the electrical wire harness connectors from the shift motor.
  5. Remove the four shift motor cover-to-axle housing retaining bolts.
  6. Pull the cover and shift motor assembly straight out from the axle housing.
  7. To disassemble the shift fork and shift motor from the cover, proceed as follows:
    1. Note the position of the shift fork to assure proper assembly.
    2. Remove the outboard snapring that retains the shift fork to the motor shaft and slide the fork off of the shaft.
    3. Remove the inboard snapring that located the shift fork.
    4. Remove the snapring from the motor shaft where the shaft comes through the cover then slide the motor and shaft out from the cover.

      To install:

  8. Inspect all gaskets and O-ring seals for damage and replace them as required.
  9. Inspect the nylon bushings on the shift fork and if worn, replace them.
  10. To assemble the shift motor and fork to the cover, proceed as follows:
    1. Lightly lubricate the O-ring on the motor shaft and slide it into the cover until it is fully seated.
    2. Install the motor shaft-to-cover snapring.
    3. Install the inboard shift fork snapring.
    4. Install the shift fork in the same position as was removed.
    5. Install the outboard shift fork snapring.
  11. Ensure that the locking collar inside the axle assembly slides freely back and forth. Position the locking collar so that the shift fork will engage it when installing.
  12. Install the center disconnect assembly into the axle housing. Ensure that the shift fork is engaging the locking collar.
  13. Install and tighten the four cover retaining bolts.
  14. Connect the vacuum fittings and electrical harness plugs to the shift motor assembly.
  15. Ensure that the vehicle is level and check the axle fluid level. Top off the fluid as needed.
  16. Lower the vehicle, road test and check for leaks.

Previous Next