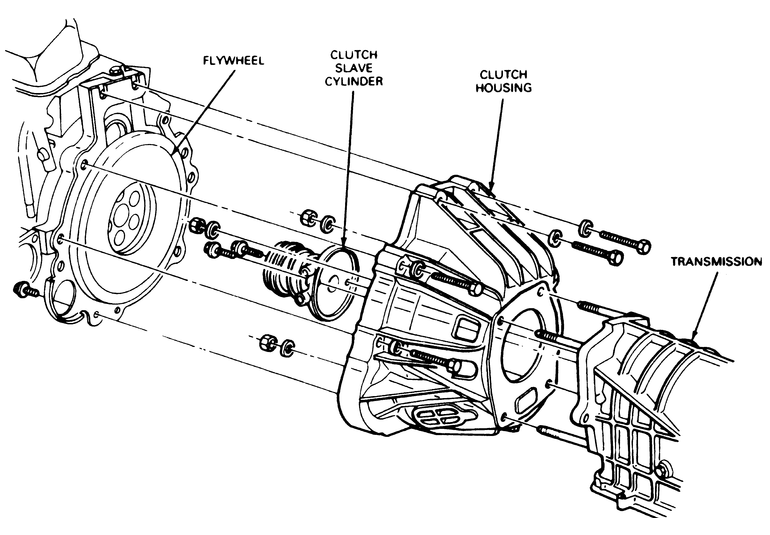
Fig. 1: Exploded view of the typical transmission-to-engine
mounting and related components
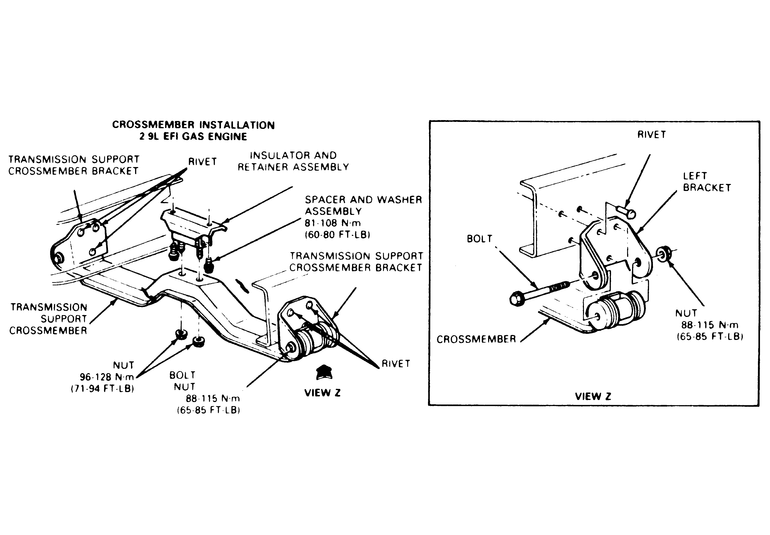
Fig. 2: Exploded view of a typical transmission crossmember
assembly
Disconnect the negative battery cable.
Remove the gearshift lever assembly from the control housing.
Cover the opening in the control housing with a cloth to prevent dirt from
falling into the unit.
Raise the vehicle and support it safely.
On 2WD vehicles, matchmark the driveshaft to the rear axle flange. Position
a drain pan under the tailend of the transmission. Remove the driveshaft-to-rear
axle flange fasteners and pull the driveshaft rearward to disconnect it from
the transmission.
Disconnect the clutch hydraulic line a the clutch housing. Plug the lines.
Disconnect the speedometer from the transfer case/extension housing.
Disconnect the starter motor, back-up lamp and, if equipped, neutral sensing
switch harness connector.
Place a wood block on a service jack and position the jack under the engine
oil pan.
On 4WD vehicles, remove the transfer case from the vehicle.
Remove the starter motor.
Position a transmission jack, under the transmission.
Remove the transmission-to-engine retaining bolts and washers.
Remove the nuts and bolts attaching the transmission mount and damper to
the crossmember.
Remove the nuts and bolts attaching the crossmember to the frame side rails
and remove the crossmember.
Lower the engine jack slightly to angle the transmission assembly. Work
the clutch housing off the locating dowels and slide the clutch housing and
the transmission rearward until the input shaft clears the clutch disc.
Lower the transmission jack and remove the transmission from the vehicle.
To install:
Check that the mating surfaces of the clutch housing, engine rear and dowel
holes are free of burrs, dirt and paint.
Place the transmission on the transmission jack. Position the transmission
under the vehicle, then raise it into position. Align the input shaft splines
with the clutch disc splines and work the transmission forward into the locating
dowels.
Install the transmission-to-engine retaining bolts and washers. Tighten
the retaining bolts to specifications. Remove the transmission jack.
Install the starter motor. Tighten the attaching nuts.
Raise the engine and install the rear crossmember, insulator and damper
and attaching nuts and bolts. Tighten and torque the bolts to specification.
On 4WD vehicles, install the transfer case.
On 2WD vehicles, insert the driveshaft into the transmission extension housing
and install the center bearing attaching nuts, washers and lockwashers. Connect
the driveshaft to the rear axle drive flange.
Connect the starter motor, back-up lamp and, if equipped, neutral sensing
switch connectors.
Connect the hydraulic clutch line and bleed the system.
Install the speedometer cable.
Check and adjust the fluid level.
Lower the vehicle.
Install the gearshift lever assembly. Install the boot cover and bolts.
Reconnect the negative battery cable.
Check for proper shifting and operation of the transmission.