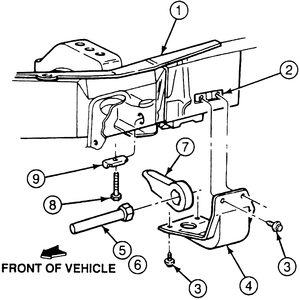
| Fig. 1: Exploded view of the torsion bar rear mounting
components

|
NOTE: A special tool (Torsion Bar Tool T95T-5310-A) is required
for removing the torsion bar. Also, anytime the torsion bar or its adjuster
is removed, the vehicle ride height must be checked.
- Raise and safely support the front of the vehicle. Place the jackstands
so as to support the frame of the vehicle. Do not position the jackstands
under the lower control arms and do not use car ramps. The lower control arms
must be free to hang unhindered.
- Remove the torsion bar protector/skid plate from the frame.
- Remove the torsion bar adjuster bolt from the support nut. Count the number
of turns required to remove the bolt and record it for installation.
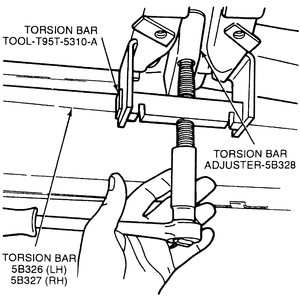
- Use Torsion Bar Tool T95T-5310-A, or equivalent, to raise the adjuster lever.
| Fig. 2: Use the torsion bar tool to relieve the tension
from the bar

|
- Remove the support nut then lower the adjuster lever completely.
- Slide the torsion bar forward, into the lower control arm, to allow the
adjuster lever to be removed.
- Lower the torsion bar and pull it from the lower control arm.
NOTE: Ensure that you do not mix up the right and left-hand
torsion bars. They must be installed to the side they were originally removed.
If installing a new torsion bar, ensure to order the bar for the proper
side of the vehicle.
To install:
- Raise the torsion bar and slide it forward into the lower control arm.
- Slide the torsion bar rearward and engage it into the adjuster lever.
- Use Torsion Bar Tool T95T-5310-A, or equivalent, to raise the adjuster lever.
- Install the support nut and remove the tool.
- Lubricate the tip of the adjuster bolt and start it into the support nut.
- Tighten the adjuster the same number of turns you recorded earlier, then
rotate two additional turns.
- Install the torsion bar protector/skid plate. Tighten the bolts securely.
- Lower the vehicle and check the ride height adjustment.


