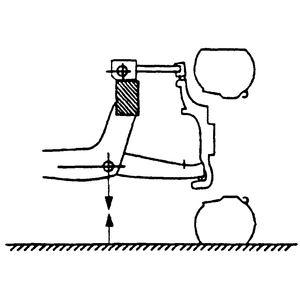
| Fig. 1: Measure the distance between the center of the
lower control arm bushing bolt and the ground

|
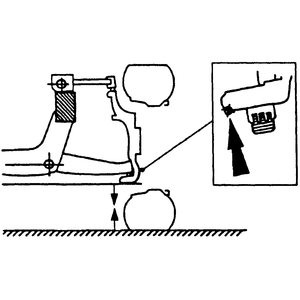
| Fig. 2: Measure the distance between the lowest point
of the steering knuckle (but not the ball joint) and the ground

|
NOTE: To perform the ride height check and adjustment requires
the use of special slip plates under the front wheels. These plates allow the
front suspension to properly settle by bypassing the tires adhesion to the ground.
- Raise and support the vehicle.
- Position frictionless slip plates under the tires then lower the vehicle
onto the slip plates.
- Bounce the vehicles front and rear suspensions several times to normalize
the vehicle static ride height.
- Measure the distance between the center of the lower control arm bushing
bolt and the ground. Record the measurement as dimension A.
- Measure the distance between the lowest point of the steering knuckle (but
not the ball joint) and the ground. Record the measurement as dimension B.
- Subtract dimension B from dimension A for ride height.
- Ride height should be 4.33–4.56 in. (110–116mm).
- To increase the ride height, raise the vehicle and tighten the torsion bar
adjuster bolt. Recheck the ride height.
- To decrease the ride height, raise the vehicle and loosen the torsion bar
adjuster bolt. Recheck the ride height.
- Once proper ride height is established, raise and support the vehicle.
- Remove the slip plates from under the wheels.
- Lower the vehicle.

