Previous Next

Rear Wheel Lug Studs

REMOVAL & INSTALLATION

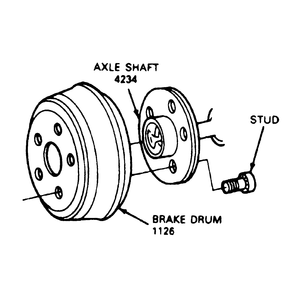
Fig. 1: Brake drum and stud

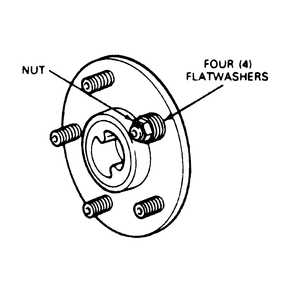
Fig. 2: Forcing a new stud into place

  1. Raise and support the vehicle safely.
  2. Remove the tire and wheel assembly.
  3. On Navajo and B Series Pick-up, remove the brake drum.
  4. On MPV, remove the rear disc brake caliper, bracket and rotor.
  5. Using wheel stud removal tool T74P-3044-A1 or equivalent, press the lug stud from its seat in the hub.

    WARNING
    Never use a hammer to remove the lug stud, as damage to the hub or bearing may result.

    To install:

  6. Insert the new lug stud in the hole in the hub. Rotate the stud slowly to assure the serrations are aligned with those made by the old lug nut stud.
  7. Place 4 flat washers over the outside end of the lug nut stud and thread the wheel lug nut with the flat washer side against the washers.
  8. Tighten the wheel nut until the stud head seats against the back side of the hub. Do not use air tools as the serrations may be stripped from the stud.
  9. Remove the wheel lug nut and washers.
  10. On Navajo and B Series Pick-up, install the brake drum.
  11. On MPV, install the rear disc brake rotor, bracket and caliper.
  12. Install the tire and wheel assembly and snug the lug nuts.
  13. Lower the vehicle and tighten the wheel lug nuts to specification.

    CAUTION
    Retighten the wheel lug nuts to specification after about 500 miles of driving. Failure to do this could result in the wheel coming off while the vehicle is in motion possibly causing loss of vehicle control or collision.

Previous Next