Previous Next

Stabilizer Bar

REMOVAL & INSTALLATION

1994–97 B Series Pick-up
  1. As required, raise and support the vehicle safely.
  2. Remove the nuts and bolts retaining the stabilizer bar to the end links.
  3. Remove the retainers and the stabilizer bar and bushings from the vehicle.

    To install:

  4. Position the stabilizer bar to the axles and brackets.
  5. Install the retainer and the end link bolts.
  6. Torque the retainer bolts to 35–50 ft. lbs. (47–67 Nm) on 1994 models and 22–30 ft. lbs. (30–40 Nm) on 1995–97 models. Torque the end link nuts to 30–41 ft. lbs. (40–55 Nm).
Navajo

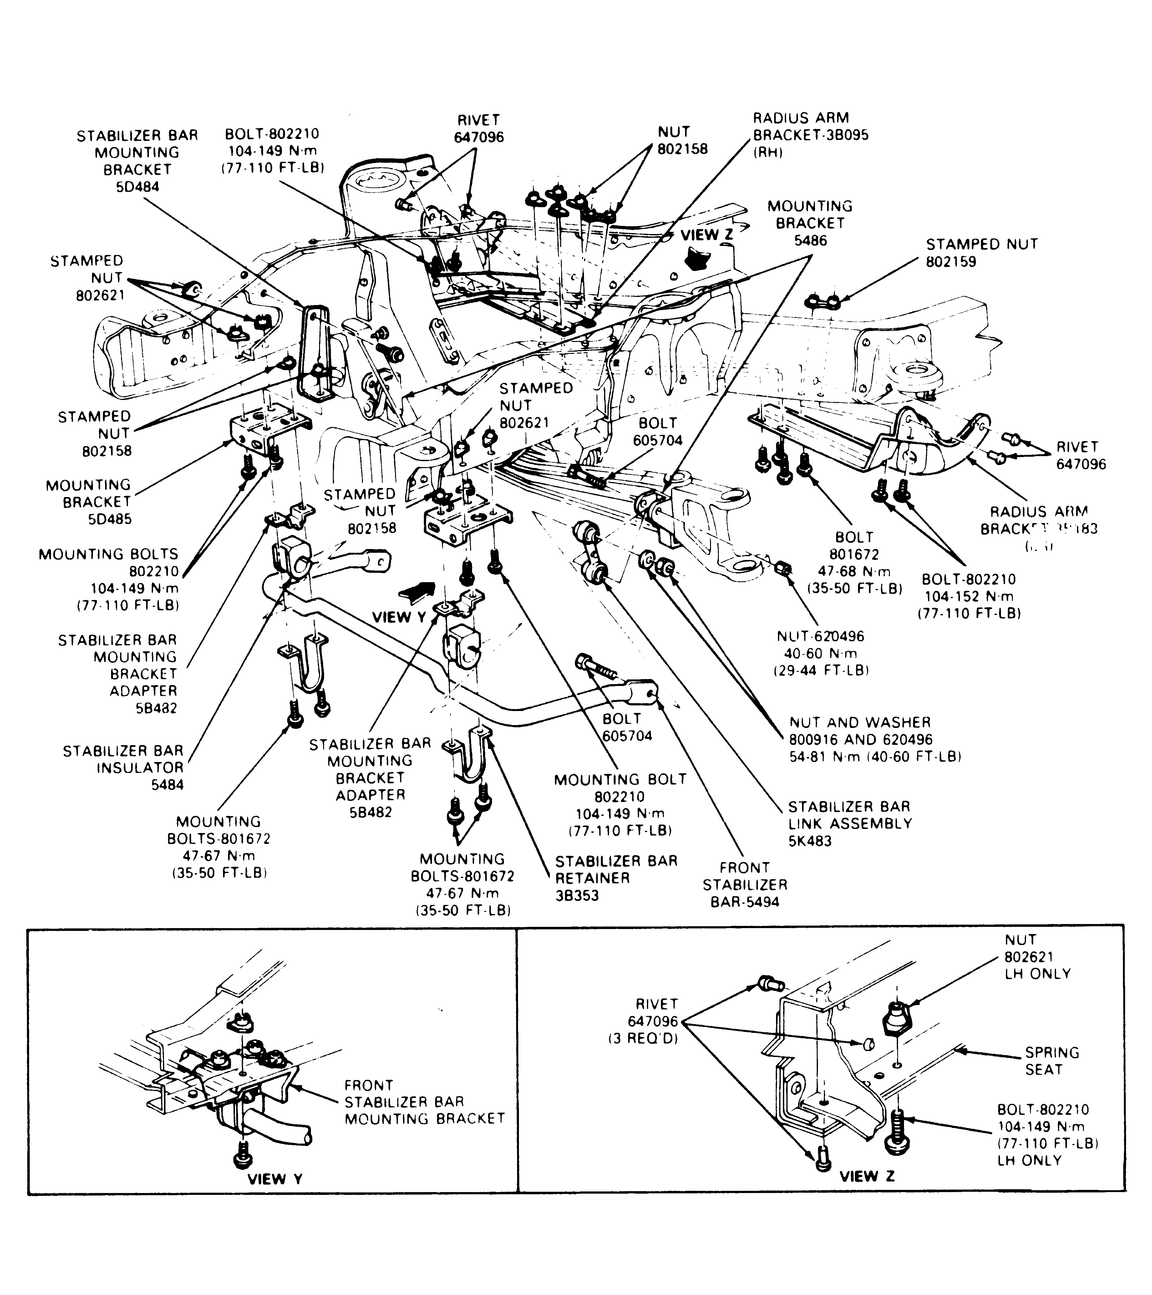
Fig. 1: Exploded view of the Navajo stabilizer bar and related parts — rear wheel drive shown, 4WD similar

  1. As required, raise and support the vehicle safely.
  2. Remove the nuts and washer and disconnect the stabilizer link assembly from the front I-beam axle.
  3. Remove the mounting bolts and remove the stabilizer bar retainers from the stabilizer bar assembly.
  4. Remove the stabilizer bar from the vehicle.

    To install:

  5. Place stabilizer bar in position on the frame mounting brackets.
  6. Install retainers and tighten retainer bolt to 35–50 ft. lbs. (47–67 Nm). If removed, install the stabilizer bar link assembly to the stabilizer bar. Install the nut and washer and tighten to 30–41 ft. lbs. (40–55 Nm).
  7. Position the stabilizer bar link in the I-beam mounting bracket. Install the bolt and tighten to 30–41 ft. lbs. (40–55 Nm).
1998 B Series Pick-up

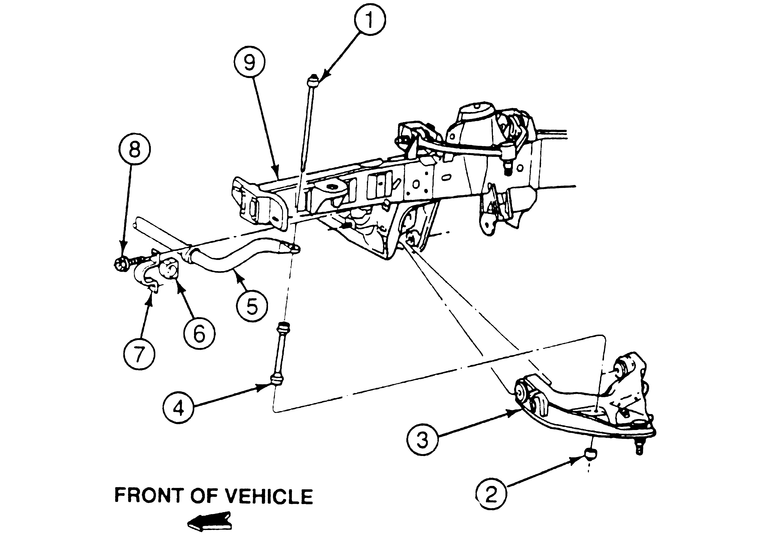
Fig. 2: Exploded view of the Mountaineer and 1995–97 Explorer stabilizer bar mounting

  1. Raise and safely support the vehicle.
  2. Remove the nut, washer and bushing (on underside of the lower control arm) linking the stabilizer bar end to the lower control arm.
  3. Lift up on the bar and remove the remaining bushings and the spacer and bolt assembly (called the end link) from the stabilizer bar end.
  4. Remove the bar mounting bracket-to-frame bolts.
  5. Remove the stabilizer bar from the vehicle. If necessary, remove the mounting brackets and insulators from the bar.

    To install:

  6. Inspect all of the stabilizer bar mounting and end link bushings. Replace any that are cracked, squashed, swollen or damaged.
  7. Position the stabilizer bar mounting brackets to the frame and install the retaining bolts loosely.
  8. Install the end link assembly to the bar end and the lower control arm. Install the end link retaining bolt loosely.
  9. Tighten the mounting bracket bolts to 25–34 ft. lbs. (34–46 Nm).

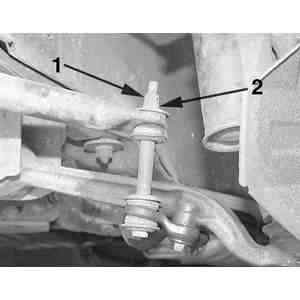
    NOTE: The end link assembly must be tightened with the vehicle weight on the front wheels.

  10. Lower the vehicle then tighten the end link retaining nut to 15–21 ft. lbs. (21–29 Nm).
MPV Models
  1. Raise and support the front end on jackstands.
  2. If equipped with 4 wheel ABS, remove the front wheel speed sensor and fix it to an appropriate place where the sensor will not be damaged while servicing the vehicle.
  3. Remove the splash shield.

    Fig. 3: Use a box wrench and a backup wrench, remove the locking nut (1) and then the retaining nut (2)

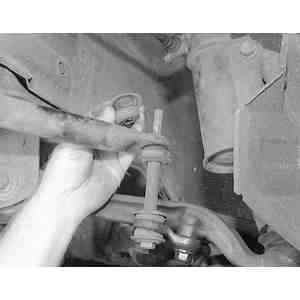
    Fig. 4: Remove the top bushing and retainer from the top of the sway bar link

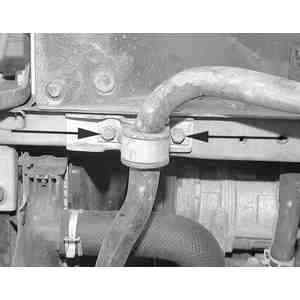
    Fig. 5: Remove the two sway bar bushing retainer mounting bolts

  4. Disconnect the end links at the compression rods (2WD) or lower control arms (4WD).
  5. Remove the clamp bolts. Lift out the stabilizer bar.
  6. Inspect all parts for wear and/or damage. Replace as necessary.

    To install:

  7. Place the sway bar on the frame and install the U-brackets finger-tight. Be sure that the bracket bushing is aligned with the mark on the stabilizer bar. Install the bracket so that the F mark on the bracket faces the front of the vehicle.
  8. Install the end links to the control arms, or compression rods, and tighten until, on 2WD, 0.35–0.43 in. (9–11mm) of thread is visible above the nut; on 4WD, 0.20–0.28 in. (5–7mm) of thread is visible above the nut.
  9. If equipped with 4-wheel ABS, install the front wheel speed sensors.
  10. Lower the vehicle to the floor and tighten the U-bracket bolts to 37–44 ft. lbs. (51–60 Nm) on 2WD or 14–18 ft. lbs. (19–25 Nm) on 4WD.
  11. Install the splash shield.
  12. Lower the vehicle.

Previous Next