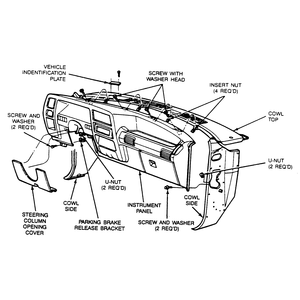
| Fig. 1: Exploded view of the 1994 instrument panel assembly
|
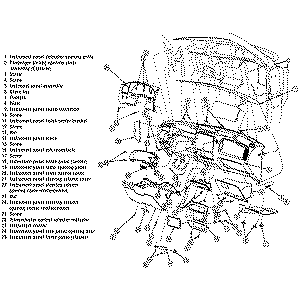
| Fig. 2: Exploded view of the 1995–98 instrument
panel assembly
|
CAUTION
Some models covered by this manual may be equipped with a Supplemental Restraint
System (SRS), which uses an air bag. Whenever working near any of the SRS components,
such as the impact sensors, the air bag module, steering column and instrument
panel, disable the SRS, as described in Section 6.
- Disconnect the negative battery cable.
- Disconnect the instrument panel wiring connectors in the engine compartment.
- Remove the 2 screws retaining the lower steering column cover and remove
the cover.
- Remove the ashtray and retainer.
- Remove the upper and lower steering column shrouds.
- Remove the instrument cluster finish panel. Remove the radio assembly and
equalizer, if equipped.
- Remove the screws retaining the instrument cluster. Remove the cluster,
making sure to disconnect the electrical leads.
- Remove the screw that attaches the instrument panel to the brake and clutch
pedal support.
- Disconnect the wiring from the switches on the steering column.
- Remove the front inside pillar mouldings.
- Remove the right side cowl trim cover.
- Remove the lower right insulator from under the instrument panel.
- Remove the 2 bolts retaining the instrument panel to the lower right side
of the cowl.
- Remove the 2 screw retaining the instrument panel to the parking brake bracket,
on the drivers side.
- Remove the 4 screw retaining the top of the instrument panel.
- Reach through the openings in the instrument panel and disconnect any remaining
electrical connectors. Disconnect the heater/air conditioning controls.
NOTE: Removing the instrument panel will be much easier
with the help of an assistant, as it is extremely bulky and difficult to
maneuver.
- Carefully tilt the instrument panel forward and remove it from the vehicle.
Work the instrument panel around the steering wheel.
To install:
- If the instrument panel is being replaced, transfer all mounting brackets
and switches to the new panel.
- Position the instrument panel inside the vehicle and install the 4 screw
that retain it along the top.
- Install the retaining screws on the left and right sides. Make sure the
instrument panel is properly mounted.
NOTE: Making sure the instrument panel is positioned correctly
at this point, will avoid problems with fit and rattles, after its installed.
Also check for pinched or cut wires.
- Install the mouldings and the trim panels.
- Connect the heater/air conditioning controls and all of the instrument panel
switches.
- Connect the wiring to the steering column switches.
- Install the instrument cluster, radio and ashtray assemblies.
- Install the instrument cluster finish panel.
- Install the steering column shrouds.
- Reconnect all wiring connectors in the engine compartment.
- Connect the negative battery cable.
- Check the operation of ALL accessories.
CAUTION
Some models covered by this manual may be equipped with a Supplemental Restraint
System (SRS), which uses an air bag. Whenever working near any of the SRS components,
such as the impact sensors, the air bag module, steering column and instrument
panel, disable the SRS, as described in Section 6.
- Disconnect the negative battery cable.
- Remove the hood release knob, steering wheel and column cover.
- Remove the combination switch.
- Remove the instrument cluster assembly. Remove the side cover.
- Remove the right side undercover pad (vehicles equipped). Remove the right
and left side lower panel assemblies.
- Remove the left side duct, ashtray and audio panel assembly.
- Remove the radio. Remove the lower center panel.
- Remove the switch knobs and the upper switch panel. Remove the temperature
control, blower control and airflow mode control.
- Remove the upper garnish and the dash panel.
- Position and secure the dash panel. Install the upper garnish. Install the
airflow mode control, blower control and temperature control.
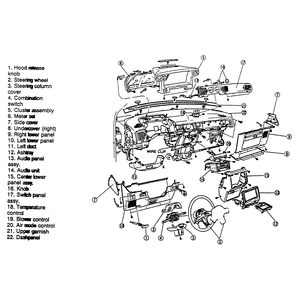
| Fig. 3: Exploded view of the 1994–95 MPV instrument
panel assembly
|
To install:
- Install the upper switch panel and switch knobs.
- Install the lower center panel. Install the audio unit, audio panel, ashtray
and left side duct.
- Install the left and right side lower panel assemblies. If equipped, install
the right side undercover pad.
- Install the side cover cluster assembly. Install the combination switch
and steering column cover.
- Install the steering wheel. Install the hood release knob. Connect the negative
battery cable.
- Check the operation of ALL accessories.
CAUTION
These models are equipped with a Supplemental Restraint System (SRS), which
uses an air bag. Whenever working near any of the SRS components, such as the
impact sensors, the air bag module, steering column and instrument panel, disable
the SRS, as described in Section 6.
- Disconnect the negative battery cable.
- Remove the A-pillar trim.
- Remove the front side trim.
- Using a small prying tool, remove the side panel by disengaging the retaining
clips.
- Remove the steering wheel.
- Remove the steering column upper and lower covers.
- Remove the hood release lever.
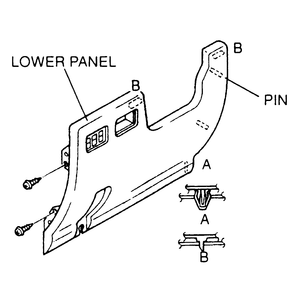
- Remove the lower instrument panel retaining screws, then pull the panel
forward to disengage the clips and pins. Remove the lower panel from the vehicle.
- Remove the instrument cluster.
| Fig. 4: Removal of the lower panel assembly
|
| Fig. 5: Glove compartment removal procedure

|
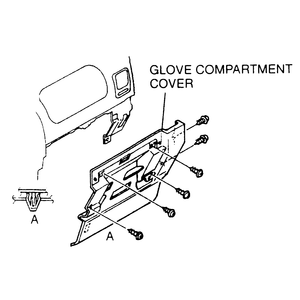
| Fig. 6: Removal of the glove compartment cover
|
- Remove the glove compartment by sliding it to the left and pulling the right
side forward to remove the stopper and pin, then sliding it to the right.
- Remove the glove compartment cover retaining screws, then pull the cover
forward to disengage the clips. Remove the glove compartment cover from the
vehicle.
- Remove the passenger's side air bag module by first removing the module
mounting bolts. Lift the air bag module out just enough to disengage the wiring
harness connector. Carefully remove the module from the vehicle. Properly
store the module with the trim side facing up.
- Remove the installation bolts securing the steering column shaft to the
dashboard and lower the shaft.
- Disconnect the air intake wire from the blower unit.
- Disconnect the air mix cable and airflow mode cable from the front heater
unit.
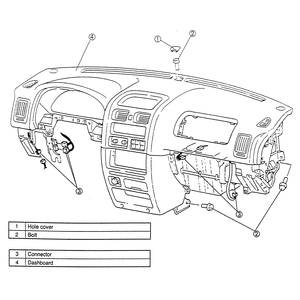
- Using a small prying tool, remove the hole cover(s) from the top of the
dashboard.
- Remove the mounting bolts from the top, side and lower center of the dashboard
assembly.
- Disengage and label all of the wiring harness connectors necessary for instrument
panel removal.
- Remove the instrument panel assembly from the vehicle.
| Fig. 7: Instrument panel assembly
|
To install:
- Place the instrument panel assembly, properly positioned, into the vehicle.
- Plug in all of the wiring harness connectors that were disengaged for instrument
panel removal.
- Install and tighten the mounting bolts onto the top, side and lower center
of the dashboard assembly.
- Install the hole cover(s) on the top of the dashboard.
- Connect the air mix cable and airflow mode cable to the front heater unit.
- Connect the air intake wire to the blower unit.
- Raise the steering column up to the lower edge of the instrument panel and
tighten the installation bolts.
- Hold the passenger's side air bag module close enough to the instrument
panel to plug in the wiring harness connector, then lower the module into
position on the instrument panel. Install and tighten the module mounting
bolts.
- Install the glove compartment cover onto the lower part of the instrument
panel. Be sure that the cover retaining clips engage then tighten the retaining
screws.
- Install the glove compartment.
- Install the instrument cluster.
- Install the lower cover onto the instrument panel. Be sure that the cover
retaining clips and pins engage then tighten the retaining screws.
- Install the hood release lever.
- Install the steering column upper and lower covers.
- Install the steering wheel.
- Install the side panels by engaging the retaining clips.
- Install the front side trim.
- Install the A-pillar trim.
- Connect the negative battery cable.
- Check the operation of ALL accessories.


