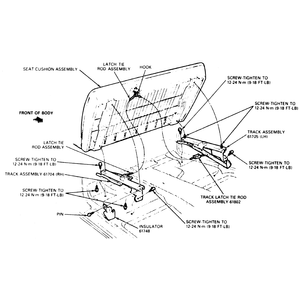
| Fig. 1: B Series Pick-up bench seat
|
- On the right side, remove the seat track insulator.
- Remove 4 seat track-to-floor retaining screws (2 each side) and lift the
seat and track assembly from vehicle.
- To remove the tracks from the seat, place the seat upside-down on a clean
bench.
- Disconnect the track latch tie rod assembly from latch lever and hook in
the center of the cushion assembly.
- Remove 4 track-to-seat cushion retaining screws (2 each side) and remove
the tracks from the cushion assembly.
To install:
- Position the track to the cushion assembly. Install the 4 track-to-seat
retaining screws and tighten.
- Connect the track latch tie rod assembly to the latch lever and hook in
center of cushion.
- Position the seat and track assembly in the vehicle.
- Install the 4 seat track-to-floor retaining screws and tighten to specification.
- On the right side, install the seat track insulator.
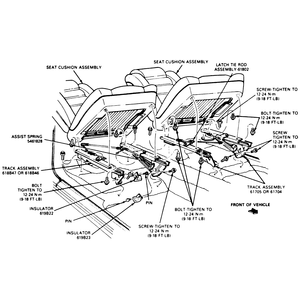
| Fig. 2: B Series Pick-up bucket seat
|
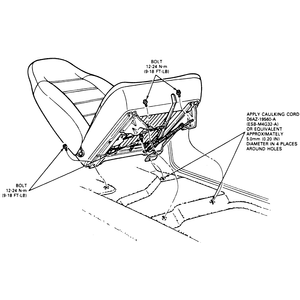
| Fig. 3: Navajo bucket seat
|
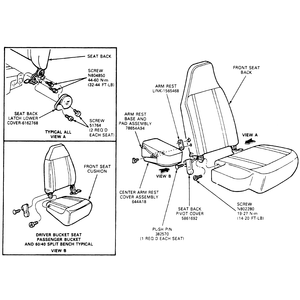
| Fig. 4: 60/40 split seat — Navajo
|
- Remove the seat track insulator (B Series Pick-up passenger seat only).
- Remove the 4 seat track-to-floorpan screws (2 each side) and lift the seat
and track assembly from the vehicle.
- To remove the seat tracks from the seat cushion, position the seat upside
down on a clean bench.
- Disconnect the latch tie rod assembly and assist spring from the tracks.
- Remove 4 track-to-seat cushion screws (2 each side) from the track assemblies.
Remove the tracks from seat cushion.
To install:
- Position the tracks to the seat cushion. Install the 4 track-to-seat cushion
screws (2 each side) and tighten.
- Connect the latch tie rod assembly and assist spring to the tracks.
- Position the seat and track assembly in the vehicle.
- Install 4 track-to-floorpan screws and tighten to specification.
- Install the seat track insulators (B Series Pick-up passenger seat only).
- Remove the fuel filler lid opener.
- Remove the parking brake lever.
- Remove the seat bracket covers.
- Remove the seat leg covers.
- Remove the seat bracket-to-floor bolts and lift out the seat.
- Installation is the reverse of removal. Torque the bracket-to-floor bolts
to 25–41 ft. lbs. (34–56 Nm).
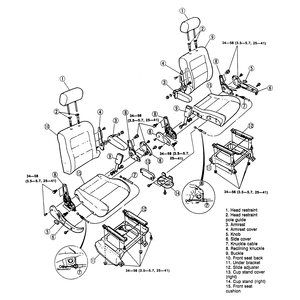
| Fig. 5: Front seat components
|
- Remove the jack cover.
- Remove the jack and jack handle.
- Remove the seat bracket covers.
- Remove the seat leg covers.
- Remove the seat bracket-to-floor bolts and lift out the seat.
- Installation is the reverse of removal. Torque the bracket-to-floor bolts
to 25–41 ft. lbs. (34–56 Nm).
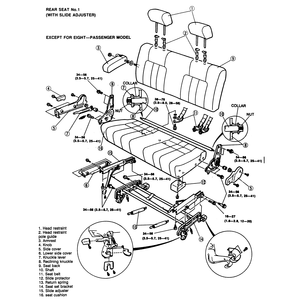
| Fig. 6: No. 1 rear seat components
|
The seat is removed by simply unlatching the release levers on the seat legs.
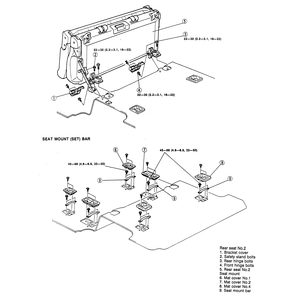
| Fig. 7: No. 2 rear seat and seat mounts
|
- Remove the seat bracket cover.
- Remove the folding link bolts.
- Remove the rear hinge bolts.
- Remove the front hinge bolts.
- Lift out the seat.
- Installation is the reverse of removal. Torque all bolts to 16–22
ft. lbs. (22–30 Nm).

